Laravel Passport with Grant Type Password in Postman

Edit: Tutorial has not yet updated to the latest Laravel version. Some configurations might have been different on the new ones.
Introduction
Laravel Passport is a great application when building API into your application. Integrating OAuth is now fast and easy. With just few commands, you will have a fully working OAuth server. Having that, we need a client that can interact with our server. Postman is a handy REST API client. You don’t need to create client in order to test your APIs. It has lots of features that could lessen the burden of running and testing your API.
The tutorial is simple. All we need is to have a working laravel installation. Follow steps provided in the Laravel Passport documentation. Then we’ll use Postman and play with our API.
Installation
I have installed laravel installer on my computer so will use it to install our laravel application. You can use composer to install your laravel application. It won’t matter. Then we move into the project directory. Add laravel/passport via composer.
laravel new PassportPostman
cd PassportPostmand
composer require laravel/passport
Above commands might require to install some dependencies. Please install them. Now once we have setup our laravel application and installed laravel passport. We will proceed with the configuration.
Configuration
Add the Laravel\Passport\PassportServiceProvider::class, service provider into the config/app.php file. This allows us to access the laravel passport services.
We will then run laravel passport migrations. This will create the needed schema for our database. Be sure to configure first your .env file. We need to seed our users table also. You can use tinker or create a seed for your users table. After that, we will install passport. From here the command will generate access keys, and personal and password clients. Which we will use when we access the API later.
php artisan migrate
php artisan db:seed
php artisan passport:install
When we say authentication it involves users and access. So we will modify the User model and add the Laravel\Passport\HasApiTokens traits. If you are wondering what’s inside this traits. You can open the source and see some available methods within.
<?php

namespace App;

use Laravel\Passport\HasApiTokens;
use Illuminate\Notifications\Notifiable;
use Illuminate\Foundation\Auth\User as Authenticatable;

class User extends Authenticatable
{
    use HasApiTokens, Notifiable;
}
Earlier we made changes to our service providers. That was registering our laravel passport service provider. This one is the routes. We will modify the boot() method of our AuthServiceProvider class and register the laravel passport routes. This will create the /oauth/* routes. Try to run php artisan route:list and see that there are additional routes made after this.
<?php

namespace App\Providers;

use Laravel\Passport\Passport;
use Illuminate\Support\Facades\Gate;
use Illuminate\Foundation\Support\Providers\AuthServiceProvider as ServiceProvider;

class AuthServiceProvider extends ServiceProvider
{
    /**
     * The policy mappings for the application.
     *
     * @var array
     */
    protected $policies = [
        'App\Model' => 'App\Policies\ModelPolicy',
    ];

    /**
     * Register any authentication / authorization services.
     *
     * @return void
     */
    public function boot()
    {
        $this->registerPolicies();

        Passport::routes();
    }
}
Finally, we will modify config/auth.php to use laravel passport when authenticating.
<?php

return [

    /*
    |--------------------------------------------------------------------------
    | Authentication Defaults
    |--------------------------------------------------------------------------
    |
    | This option controls the default authentication "guard" and password
    | reset options for your application. You may change these defaults
    | as required, but they're a perfect start for most applications.
    |
    */

    'defaults' => [
        'guard' => 'web',
        'passwords' => 'users',
    ],

    /*
    |--------------------------------------------------------------------------
    | Authentication Guards
    |--------------------------------------------------------------------------
    |
    | Next, you may define every authentication guard for your application.
    | Of course, a great default configuration has been defined for you
    | here which uses session storage and the Eloquent user provider.
    |
    | All authentication drivers have a user provider. This defines how the
    | users are actually retrieved out of your database or other storage
    | mechanisms used by this application to persist your user's data.
    |
    | Supported: "session", "token"
    |
    */

    'guards' => [
        'web' => [
            'driver' => 'session',
            'provider' => 'users',
        ],

        'api' => [
            'driver' => 'passport',
            'provider' => 'users',
        ],
    ],

    /*
    |--------------------------------------------------------------------------
    | User Providers
    |--------------------------------------------------------------------------
    |
    | All authentication drivers have a user provider. This defines how the
    | users are actually retrieved out of your database or other storage
    | mechanisms used by this application to persist your user's data.
    |
    | If you have multiple user tables or models you may configure multiple
    | sources which represent each model / table. These sources may then
    | be assigned to any extra authentication guards you have defined.
    |
    | Supported: "database", "eloquent"
    |
    */

    'providers' => [
        'users' => [
            'driver' => 'eloquent',
            'model' => App\User::class,
        ],
    ],

    /*
    |--------------------------------------------------------------------------
    | Resetting Passwords
    |--------------------------------------------------------------------------
    |
    | You may specify multiple password reset configurations if you have more
    | than one user table or model in the application and you want to have
    | separate password reset settings based on the specific user types.
    |
    | The expire time is the number of minutes that the reset token should be
    | considered valid. This security feature keeps tokens short-lived so
    | they have less time to be guessed. You may change this as needed.
    |
    */

    'passwords' => [
        'users' => [
            'provider' => 'users',
            'table' => 'password_resets',
            'expire' => 60,
        ],
    ],
];
Usage
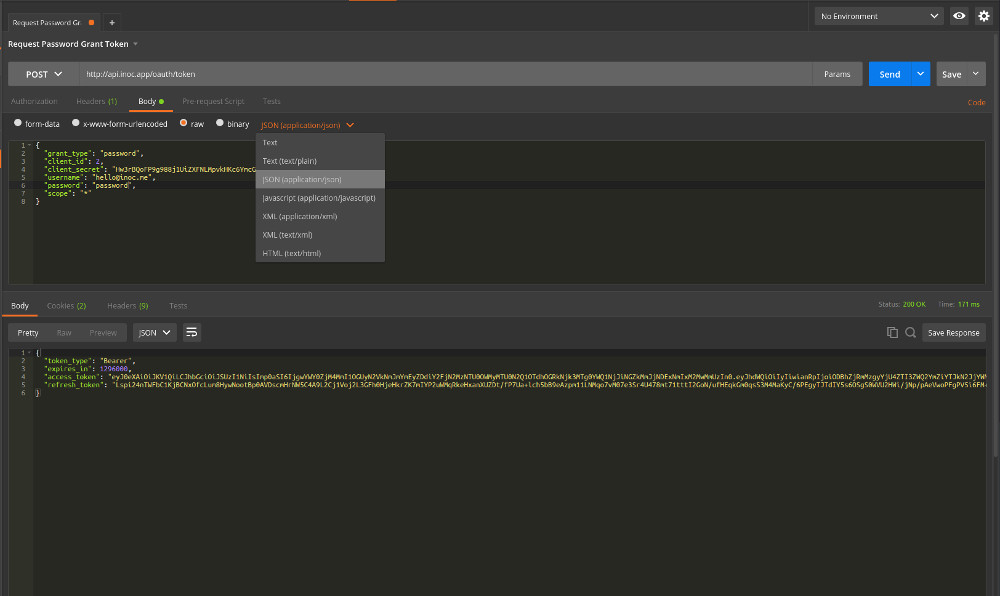
Time to test the password grant in our API. Remember, I’ve mention about the tokens? Try to get them. Open your database manager and look into the oauth_clients table. Get the id and secret of the enabled password_client. Set our postman parameters and we should be able to get the tokens on the response.

Conclusion
It took me a while to figure out why my setup fails when using laravel passport with grant type password. With so many tutorials and questions relating to this topic. Lots of confusion getting in, especially to those new developers trying to adapt this new beautiful API.